Quick Start
Five minutes from a raw mocap take to a working root-motion clip.
1. Import your take
Import the mocap animation onto your skeleton as usual (or record directly in engine). Play it in the Animation Editor - with raw mocap you'll typically see the character walk away from the origin while the root bone stays at (0,0,0).
2. Process it
Right-click the Animation Sequence in the Content Browser → TakeForge → Smoothed Root Motion.
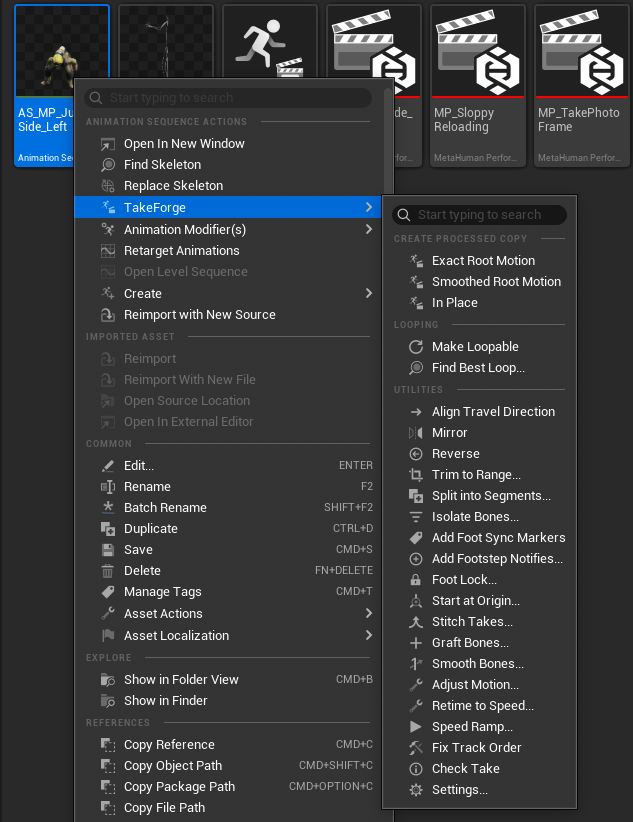
An options dialog opens, pre-filled with sensible defaults:
- Pelvis bone - auto-detected (
pelvis,hips, …); override for unusual rigs - Smoothing strength - how clean the capsule path should be (default: removes hip sway)
- Start at origin - the clip begins at (0,0)
- Sync markers / speed curves - added automatically
Click OK. A new asset appears next to the original:
Walk_Take3            <- your original, untouched
Walk_Take3_RootMotionSmooth   <- root motion on the root bone, Enable Root Motion set
The notification shows what happened: travel distance, average speed, and how many foot sync markers were placed.
3. Verify
Open the new asset. In the viewport, enable Character → Root Motion → Loop
- the character now travels, driven by the root bone. In the Asset Details panel, Enable Root Motion is already checked.
4. Use it in gameplay
Root motion is consumed either by:
- playing the clip as a Montage (with root motion enabled), or
- setting Root Motion Mode → Root Motion from Everything in your Anim Blueprint's class defaults.
The capsule now follows the character exactly along the smoothed path.
5. Need the in-place version too?
Right-click the same original take → TakeForge → In Place. You get
Walk_Take3_InPlace - travel removed, natural sway kept, original speed
preserved in the RootMotion_Speed curve, foot markers ready for blendspace
sync groups.
Continue with Root Motion Modes for what each output does in detail.