Graft Bones
Splice another take's movement onto part of the skeleton - a baked Layered
Blend Per Bone. The body keeps playing take A while the head, an arm, or the
face plays take B. Output suffix: *_Grafted.
Use cases straight from the mocap trenches:
- The run cycle is perfect but the head look is wrong - graft the head branch from a different take.
- Same body performance, different attack - graft
clavicle_rdown from each attack take to build variants. - The shot is good but the facial expression isn't - graft the facial bone branch from a better take.
How it works
- Local bone space: the grafted branch rides on whatever the target's body is doing - exactly like the Layered Blend Per Bone node, but baked into a real asset that drops into montages and blendspaces.
- Two frame windows: take source frames
[from, to]and land them on target frames[from, to]. Different lengths (or frame rates) are fine - the source window is retimed to fit, with fractional-frame interpolation. - Seam blending: the graft fades in/out over Blend Frames at the target window's edges, so there's no pop where takes meet.
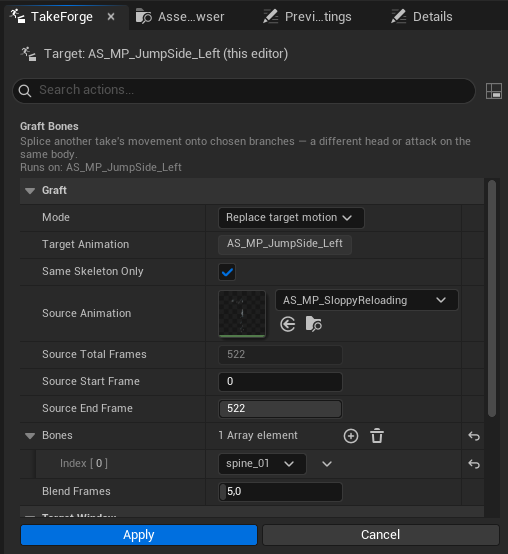
Options
| Option | Meaning |
|---|---|
| Same Skeleton Only | Filters the picker to takes on the target's exact skeleton (default on) - retargeted libraries are full of same-named takes on other rigs. Uncheck to browse everything |
| Source Animation | The take to graft from |
| Source Start / End Frame | Source window (inclusive) - sliders capped to the source's length, auto-filled to the whole source when you pick one |
| Whole Clip Per Take | Graft across each target take's own full length - on by default when more than one take is selected (see below) |
| Target Start / End Frame | Where the graft lands (prefilled to the whole clip). Greyed out while Whole Clip Per Take is on |
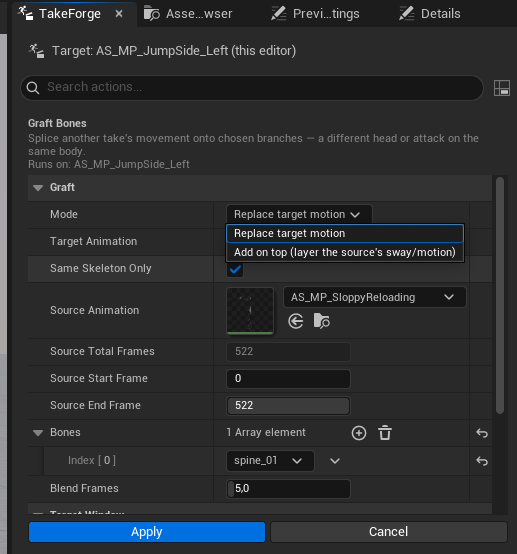
| Mode | Replace swaps the branches' motion for the source's; Add on top layers the source's sway/motion onto the target (see below) |
| Bones | Branches to graft - each entry replaces the bone and everything beneath it |
| Blend Frames | Fade width at the window edges (default 5) |
| Create New Asset | New *_Grafted copy (default) or in-place rewrite |
Root motion is never touched unless you explicitly include root in the bone
list. Float curves, notifies, and sync markers stay the target's own.
Grafting a batch
Select several takes and one graft lands on all of them. The frame fields describe the first take only, so a single window cannot serve a batch of takes with different lengths: a 30-frame window covers all of a 30-frame take and less than a third of a 100-frame one, which keeps its own motion for the rest.
Whole Clip Per Take resolves the window per take instead - each one is grafted from its first frame to its last. It is on by default for a multi-take selection and off for a single take; untick it to apply the explicit window to every take on purpose.
Cross-skeleton grafting
The source doesn't have to live on the same skeleton asset - bones are matched by name. Uncheck Same Skeleton Only and any take whose branch bones share the target's names grafts fine (the usual case: the same rig imported twice, or takes retargeted onto a naming-compatible skeleton). Translations are scaled by the rigs' size ratio (measured from pelvis rest heights), so a bigger rig's offsets don't deform a smaller one - the result note reports the ratio. Add on top mode is the most robust cross-skeleton, since it transfers deviations rather than absolute pose.
Genuinely different rigs (other hierarchy or bone names - Mixamo vs MetaHuman) are a job for UE's IK Retargeter first; graft the retargeted result.
Grafting copies bone animation. MetaHuman faces are bone-driven
(FACIAL_*), so the facial use case works; rigs whose faces run purely on
float curves (ARKit-style) would need their curves copied separately.
Add on top (additive layering)
In Add on top mode the source's motion doesn't replace the target's - the
source's deviation from its own window-average pose is layered onto
whatever the target is doing. The source's base pose stays out of it; only
its movement transfers. Output suffix becomes *_Layered.
- Layer a breathing/sway idle onto a stiff aim pose
- Add a flinch or shiver on top of any clip
- Put subtle head bob from one take onto another's performance
Isolate Bones turns takes into clean single-purpose overlay sources; Graft splices them together; Smooth Bones with a frame window cleans any residual seam.
Scripting:
ok, err = unreal.TakeForgeLibrary.graft_bones(
    target_seq, source_seq, ["neck_01"],
    source_start_frame=30, source_end_frame=90,
    target_start_frame=45, target_end_frame=105,
    blend_frames=5.0, add_on_top=False)