Trim & Split
Real mocap recordings contain more than the action you want: calibration T-poses at the head, the actor walking back to the mark, several takes in one recording. Trim and Split edit frame ranges directly on assets - no DCC round trip.
Trim to Range - *_Trim
Keeps only the frames you choose; everything outside the range is removed.
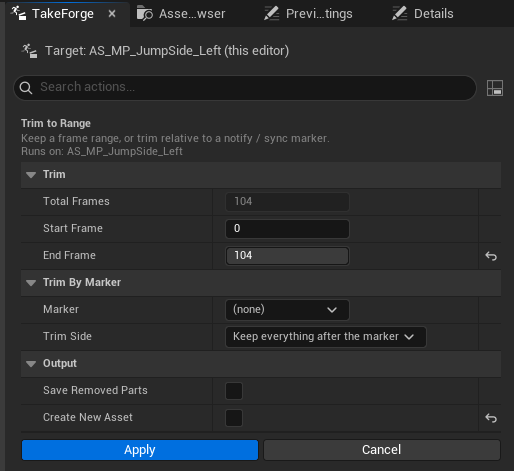
The dialog shows the clip's total frames and asks for Start Frame and End Frame (inclusive). Bone tracks, curves, notifies, and sync markers are all sliced and shifted to the new timeline; anything outside the kept range is removed.
Save Removed Parts (checkbox in the dialog) additionally writes the
cut-away pieces as their own assets: the frames before the range become
*_Head, the frames after it become *_Tail. Handy when the "garbage" at the
end of a recording is actually another usable action.
Typical use - cutting the calibration pose and trailing dead time:
0                 45                                  380        421
|  T-pose, settle  |         the actual walk           |  drift   |
                   ^ Start = 45              End = 380 ^
Trim is the one action many pipelines run in place (uncheck Create New
Asset in the dialog): clean the original take first, then generate suffixed
root-motion/in-place copies from it so intermediate _Trim assets don't pile
up.
Split into Segments - *_Seg1, *_Seg2, …
Splits one recording into several assets. Add cut frames to the array in the dialog - N cut points produce N+1 segments covering the whole clip:
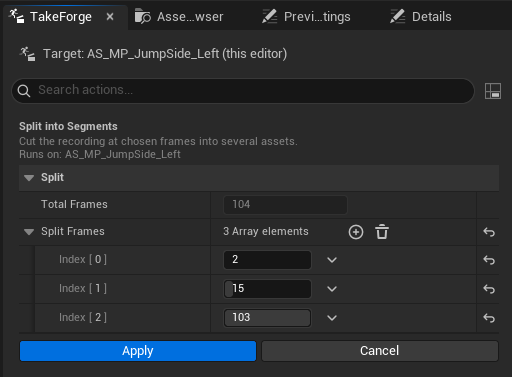
Split Frames: [120, 250]

Take_Seg1  <- frames 0–120
Take_Seg2  <- frames 121–250
Take_Seg3  <- frames 251–end
Every segment becomes its own copy of the source; nothing is dropped. To discard a segment (say, the calibration head), just delete that asset - or use Trim with Save Removed Parts instead.
Split always creates new assets regardless of the Create New Assets setting, since one input produces several outputs.
Batch caveat
When multiple sequences are selected, the same range(s) are applied to every one, and the dialog is pre-filled from the first. That's right for uniform recordings, wrong for takes of different lengths - trim those one at a time.
After trimming
Frame-range edits change what "start" and "end" mean, so re-run downstream actions afterwards, not before:
Raw recording -> Trim/Split -> Align -> Root Motion / In Place -> Make Loopable
Trim by marker
Instead of typing frame numbers, anchor the trim to a notify or sync marker. The dialog's Trim by Marker section lists everything on the first selected clip with its frame position:
Marker:    [ CutHere @ frame 145 ▾ ]
Trim Side: [ Keep everything after the marker ▾ ]
Pick a marker and the frame range above is ignored - Keep after keeps
[marker..end], Keep before keeps [0..marker].
The workflow this enables: scrub the take in the Animation Editor, drop a plain notify (any name) exactly where the good part starts, then right-click → Trim → pick it → done. No frame-number bookkeeping.
Cutting at the playhead
The TakeForge panel has an At Playhead section that reads the scrub position of the animation open in the Animation Editor - shown live, e.g. Playhead: frame 56 / 104 (Walk_Take3) - with four one-click cuts:
| Button | Result |
|---|---|
| Extract Left | Frames [0..playhead] saved as a new *_Head asset |
| Extract Right | Frames [playhead..end] saved as a new *_Tail asset |
| Remove Left | Keeps [playhead..end] (respects Create New Assets) |
| Remove Right | Keeps [0..playhead] (respects Create New Assets) |
The workflow: scrub to the cut point, glance at the panel, click. Extracts always create new assets; removes follow your Create New Assets preference like any trim.